In this end to end tutorial I will show you how to run Hashicorp Vault Cloud together with Laravel. I made example code in Terraform so you can see how you can provision your Vault cluster on HashiCorp Cloud Platform (HCP) and connect it to applications that need an .env file.
Note that this tutorial will incur costs. There are three NAT Gateways, a development HCP Vault cluster and an Aurora serverless database.
The code examples below assume you do not change the prefix variable (hcp-laravel-). Where you see ACCOUNTID you must use the account ID of the organisation you have provisioned this tutorial in.
If you have not created an account on HashiCorp Cloud Platform, you can do that here. When you’ve created the account go to Settings > Access control (IAM) > Service principals and create a new Service Principal. After creating a new Service Principal generate some access keys and store the client ID and client secret in your environment variables like this:
export HCP_CLIENT_ID='CLIENTID'
export HCP_CLIENT_SECRET='CLIENTSECRET'
Why use HashiCorp Vault?
Using Vault is a great way to improve your security posture. You have a single place to keep all your secrets. This prevents secret sprawl and gives your better control over who can access the secrets. The authentication to Vault happens with IAM roles so you just need to assign an IAM role to an instance to authenticate to Vault.
Furthermore you can let developers generate temporary AWS credentials to interact with AWS S3 but then tie this into a Github username. The same approach can be taken for database credentials. Only Vault can generate them thus you can audit who had access to the database at which point. Furthermore it rotates these credentials periodically so pinpointing when and where attacks happened becomes easier.
Also off-boarding employees becomes easier. If they do not have access to Vault anymore they can not generate any credentials (for AWS or MySQL).
Integrating Vault with Laravel
You can integrate Laravel with Vault in two ways:
- Use a PHP library that connects to the Vault API and pulls the secrets from Vault, the libraries are scarce and are not well maintained, also if you choose this approach you need a way to authenticate to Vault (ie. some API key or something) which requires you to store authentication details in your application which you must manage and rotate
- Use a sidecar pattern in AWS that generates a .env file that Laravel can use, you can use the authentication mechanism from AWS (IAM roles)
This tutorial will choose the second approach. This approach has some benefits because your application does not need to store initial authentication data. The authentication takes place through the attached IAM role. Also the .env file is refreshed in the background through the Vault agent. This means your Laravel application is unaware that it is running through Vault (it just looks at the .env file).
This tutorial has two parts
In the first part we will set up the full infrastructure and get it running with two custom Docker containers.
In the second part, we will provision the contents of the Vault cluster.
Normally you could do this by using Terragrunt modules that have dependencies on each other. But for the sake of this tutorial I chose to keep it simple.
Here is the infrastructure we will set up:

Setting up Laravel on AWS
You are best off using the code in GitHub repository mentioned at the end of the article. I just explain the code here so you can follow along with the flow.
Base setup
Let’s setup the providers and pin them to a fixed version:
terraform {
  required_providers {
    vault = {
      source  = "hashicorp/vault"
      version = "3.18.0"
    }
    aws = {
      source  = "hashicorp/aws"
      version = "5.8.0"
    }
    hcp = {
      source  = "hashicorp/hcp"
      version = "0.66"
    }
  }
}

// this setup was tested with v1.5.3
provider "aws" {
  region = var.region
}

provider "hcp" {}
Note that pinning to specific versions is a bad idea but for this example it will do (it will make sure that you can follow along). If you want to make this example a module you need to remove the provider “aws” and provider “hcp” blocks. Also you need to choose a specific lower version restraint.
We use the following variables:
variable "region" {
  default     = "eu-west-1"
  description = "Region to deploy to"
  type        = string
}

variable "prefix" {
  default     = "hcp-laravel-"
  description = "Prefix to use for all resources"
  type        = string
}

variable "vault_url" {
  default     = ""
  description = "URL to your Vault cluster, if you fill it in the Vault cluster will be provisioned"
  type        = string
}
VPC
Let’s setup a VPC with some best practices:
resource "aws_eip" "nat" {
  count  = 3
  domain = "vpc"
}

module "vpc" {
  source              = "terraform-aws-modules/vpc/aws"
  version             = "5.1.0"
  name                = "${var.prefix}vpc"
  cidr                = "10.0.0.0/16"
  azs                 = ["${var.region}a", "${var.region}b", "${var.region}c"]
  private_subnets     = ["10.0.1.0/24", "10.0.2.0/24", "10.0.3.0/24"]
  public_subnets      = ["10.0.101.0/24", "10.0.102.0/24", "10.0.103.0/24"]
  enable_nat_gateway  = true
  single_nat_gateway  = false
  enable_vpn_gateway  = false
  reuse_nat_ips       = true
  external_nat_ip_ids = aws_eip.nat.*.id
}
We manage the elastic IP’s from outside the module so we can control their lifecycle if we delete the VPC. All the traffic from the private subnets will originate from these IP addresses. So if you have whitelisted them somewhere (for instance some external API) you would need to redo that otherwise.
ECS
We can create a load balancer and it’s security group outside the module:
module "alb_sg" {
  source              = "terraform-aws-modules/security-group/aws"
  version             = "5.1.0"
  name                = "${var.prefix}service"
  description         = "ALB security group"
  vpc_id              = module.vpc.vpc_id
  ingress_rules       = ["http-80-tcp"]
  ingress_cidr_blocks = ["0.0.0.0/0"]
  egress_rules        = ["all-all"]
  egress_cidr_blocks  = module.vpc.private_subnets_cidr_blocks
}

module "alb" {
  source             = "terraform-aws-modules/alb/aws"
  version            = "8.7.0"
  name               = "${var.prefix}alb"
  load_balancer_type = "application"
  vpc_id             = module.vpc.vpc_id
  subnets            = module.vpc.public_subnets
  security_groups    = [module.alb_sg.security_group_id]
  http_tcp_listeners = [
    {
      port               = 80
      protocol           = "HTTP"
      target_group_index = 0
    },
  ]
  target_groups = [
    {
      name             = "${var.prefix}web"
      backend_protocol = "HTTP"
      backend_port     = "8080"
      target_type      = "ip"
      health_check = {
        enabled = true
        matcher = "200-499"
        // we use the robots.txt of laravel for the healthcheck otherwise the load balancer will never redirect to the container
        path = "/robots.txt"
      }
    },
  ]
}
To keep it simple we are not using an SSL certificate on the load balancer.
Let us setup a ECS cluster. This Terraform module takes care of the heavy lifting for us.
data "aws_region" "current" {}
data "aws_caller_identity" "current" {}

module "ecs" {
  source       = "terraform-aws-modules/ecs/aws"
  version      = "5.2.0"
  cluster_name = "${var.prefix}cluster"
  fargate_capacity_providers = {
    FARGATE = {
      default_capacity_provider_strategy = {
        weight = 100
      }
    }
  }
  services = {
    "${var.prefix}laravel" = {
      cpu    = 1024
      memory = 2048
      volume = [
        { name = "vault-volume" }
      ]
      container_definitions = {
        "${var.prefix}laravel" = {
          readonly_root_filesystem = false
          essential                = true
          image                    = "${data.aws_caller_identity.current.account_id}.dkr.ecr.${data.aws_region.current.name}.amazonaws.com/${var.prefix}laravel:latest"
          port_mappings = [
            {
              containerPort = 8080
              protocol      = "tcp"
            }
          ]
          essential                 = true
          enable_cloudwatch_logging = true
          mount_points = [
            {
              sourceVolume  = "vault-volume",
              containerPath = "/etc/vault"
            }
          ]
          environment = [
            {
              name  = "ENVPATH"
              value = "/etc/vault/"
            }
          ]
        }
        "${var.prefix}vault" = {
          readonly_root_filesystem = false
          essential                 = false
          image                     = "${data.aws_caller_identity.current.account_id}.dkr.ecr.${data.aws_region.current.name}.amazonaws.com/${var.prefix}vault:latest"
          enable_cloudwatch_logging = true
          command                   = ["vault", "agent", "-log-level", "debug", "-config=/etc/vault/vault-agent.hcl"]
          dependsOn = [
            {
              containerName = "${var.prefix}laravel"
              condition     = "START"
            }
          ],
          mount_points = [
            {
              sourceVolume  = "vault-volume",
              containerPath = "/etc/vault"
            }
          ],
          environment = [
            {
              name  = "VAULT_ADDR"
              // hcp_vault_cluster.vault.vault_private_endpoint_url would be advisable but makes this infrastructure impossible to apply without terragrunt initially
              value = var.vault_url
            }
          ]
        }
      }
      load_balancer = {
        service = {
          target_group_arn = module.alb.target_group_arns[0]
          container_name   = "${var.prefix}laravel"
          container_port   = 8080
        }
      }
      enable_execute_command = true
      subnet_ids             = module.vpc.private_subnets
      security_group_rules = {
        alb_ingress_3000 = {
          type                     = "ingress"
          from_port                = 8080
          to_port                  = 8080
          protocol                 = "tcp"
          description              = "Laravel port"
          source_security_group_id = module.alb_sg.security_group_id
        }
        egress_all = {
          type        = "egress"
          from_port   = 0
          to_port     = 0
          protocol    = "-1"
          cidr_blocks = ["0.0.0.0/0"]
        }
      }
    }
  }
}

// could also be done with task_exec_iam_statements, but this works as well
resource "aws_iam_role_policy" "ecs_exec_policy" {
  name   = "${var.prefix}ecs-exec-policy"
  role   = module.ecs.services["${var.prefix}laravel"]["tasks_iam_role_name"]
  policy = file("${path.module}/ecs-exec-policy.json")
}
This module creates the ECS cluster and ECS service for us.
Aurora MySQL cluster
To implement a database for Laravel we can use Aurora Serverless v2. We can then also test the rotation feature of Vault and manage our database credentials from there.
resource "random_password" "password" {
  length  = 16
  special = false
}

resource "aws_db_subnet_group" "default" {
  name       = "${var.prefix}db-subnet-group"
  subnet_ids = module.vpc.private_subnets
}

module "aurora_mysql_v2" {
  source                      = "terraform-aws-modules/rds-aurora/aws"
  version                     = "8.3.1"
  name                        = "${var.prefix}mysql"
  engine                      = "aurora-mysql"
  engine_mode                 = "provisioned"
  engine_version              = "8.0"
  storage_encrypted           = true
  manage_master_user_password = false
  master_username             = "root"
  master_password             = random_password.password.result
  vpc_id                      = module.vpc.vpc_id
  db_subnet_group_name        = aws_db_subnet_group.default.name
  database_name               = "db"
  security_group_rules = {
    vpc_ingress = {
      cidr_blocks = module.vpc.private_subnets_cidr_blocks
    }
    hcp_ingress = {
      cidr_blocks = [hcp_hvn.hvn.cidr_block]
    }
  }
  monitoring_interval = 60
  apply_immediately   = true
  skip_final_snapshot = true
  serverlessv2_scaling_configuration = {
    min_capacity = 1
    max_capacity = 1
  }
  instance_class = "db.serverless"
  instances = {
    master = {}
  }
}
For simplicity sake we allow traffic from the whole VPC CIDR block instead of just the security group of the Laravel tasks. Note that setting up this cluster can take some time (around thirty minutes).
Setting up HashiCorp Vault cloud
Networking
The setting up of HashiCorp Cloud is relatively straightforward. We set up a HVN (HashiCorp virtual network) and peer this to our VPC. Note that the CIDR block of the HVN can not overlap with the CIDR block of your VPC because you need to peer the two VPC’s:
resource "hcp_hvn" "hvn" {
  hvn_id         = "${var.prefix}hvn"
  cloud_provider = "aws"
  region         = var.region
  cidr_block     = "172.25.16.0/20"
}

resource "aws_vpc_peering_connection_accepter" "main" {
  vpc_peering_connection_id = hcp_aws_network_peering.peer.provider_peering_id
  auto_accept               = true
}

resource "hcp_hvn_route" "hvn_route" {
  hvn_link         = hcp_hvn.hvn.self_link
  hvn_route_id     = "${var.prefix}vpc-route"
  destination_cidr = module.vpc.vpc_cidr_block
  target_link      = hcp_aws_network_peering.peer.self_link
}
resource "hcp_aws_network_peering" "peer" {
  hvn_id          = hcp_hvn.hvn.hvn_id
  peering_id      = "${var.prefix}peering"
  peer_vpc_id     = module.vpc.vpc_id
  peer_account_id = module.vpc.vpc_owner_id
  peer_vpc_region = var.region
}

resource "aws_route" "hcp_route" {
  // https://github.com/terraform-aws-modules/terraform-aws-vpc/pull/926
  for_each = (merge(
    zipmap(["a", "b", "c"], module.vpc.private_route_table_ids),
    zipmap(["a"], module.vpc.public_route_table_ids),
  ))
  route_table_id            = each.value
  destination_cidr_block    = hcp_hvn.hvn.cidr_block
  vpc_peering_connection_id = hcp_aws_network_peering.peer.provider_peering_id
}
Note that we allow outbound traffic to 0.0.0.0/0 on our security group for Laravel. If you use strict outbound security group settings you must make sure to allow egress traffic to the Vault cluster on TCP port 8200 to the HVN CIDR block: 172.25.16.0/20. We also need to whitelist the HVN CIDR block to our database. This way Vault can connect to the database and rotate the database credentials periodically.
In addition we also add a route to the route tables of our own VPC to send network requests destined for the HVN over the peering connection.
Cluster
We will provision a Vault cluster with public mode enabled so we can access it through the internet. This is a bad practice. Normally you should peer the VPC that provisions Vault to the HVN and access the cluster through the private endpoint URL:
resource "hcp_vault_cluster" "vault" {
  cluster_id      = "${var.prefix}vault-cluster"
  hvn_id          = hcp_hvn.hvn.hvn_id
  tier            = "dev"
  public_endpoint = true
}
The reason you do not want to use public endpoints of any kind is due to the fact that you can scan the worldwide IP4 range in about an hour. If you rely on security through obscurity you can assume that within an hour it is known that you have a Vault cluster hosted on port 8200!
You can now access the Vault cluster through the public endpoint mentioned in the output. You can generate an admin token from the Vault Cluster interface to access the Web UI.
One thing to keep in mind that in most Vault commands you need to provide a namespace from now on. The Hashicorp Vault cloud setup does not supports the root namespace so everything has to be done in the admin namespace (this is different then a self-hosted setup, also you can create your own namespaces and work in there).
Creating the Laravel Docker container
We could use a standard setup with bitnami/laravel. However this controls Laravel configuration through environment variables. In our case we want to control it through the .env file. This .env file will be generated by Vault Agent. This Vault agent runs a sidecar container together with the Laravel container.
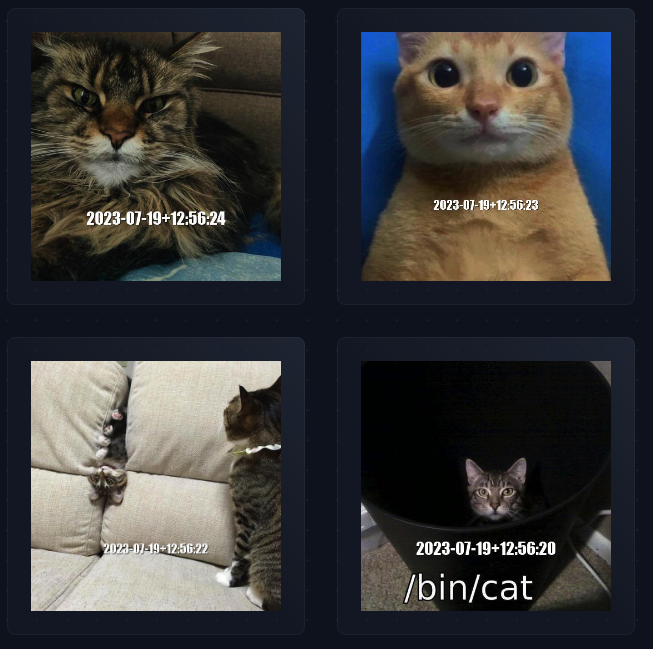
In addition we want to know if our database is working properly so I changed the Laravel homepage to randomly insert cats in a database when you open the page.
Let us first create the ECR repositories for our Docker images:
resource "aws_ecr_repository" "laravel" {
  name                 = "${var.prefix}laravel"
  image_tag_mutability = "MUTABLE"
}

resource "aws_ecr_repository" "vault" {
  name                 = "${var.prefix}vault"
  image_tag_mutability = "MUTABLE"
}
Launch the infrastructure
Run the following command:
terraform apply
This will set up the full infrastructure. It can take some time but it will not be able to launch the containers yet as these have to be pushed to the ECR registry. Continue when the infrastructure has successfully been deployed.
You can find the URL of the load balancer in the outputs of the module.
Laravel Docker container
We can use the following simple Dockerfile with php-apache:
FROM php:8.2.8-apache

# install the php extensions
COPY --from=mlocati/php-extension-installer /usr/bin/install-php-extensions /usr/local/bin/
RUN install-php-extensions gd pdo_mysql zip intl soap pcntl bcmath calendar mysqli opcache sockets apcu

# set webroot
ENV APACHE_DOCUMENT_ROOT /var/app/public
RUN sed -ri -e 's!/var/www/html!${APACHE_DOCUMENT_ROOT}!g' /etc/apache2/sites-available/*.conf && sed -ri 's|80|8080|g' /etc/apache2/sites-available/*.conf
RUN sed -ri 's|80|8080|g' /etc/apache2/ports.conf && sed -ri 's|443|8081|g' /etc/apache2/ports.conf
RUN sed -ri -e 's!/var/www/!${APACHE_DOCUMENT_ROOT}!g' /etc/apache2/apache2.conf /etc/apache2/conf-available/*.conf

# enable apache mods
RUN a2enmod rewrite
RUN a2enmod headers
RUN a2enmod ssl

# install composer
COPY --from=composer:latest /usr/bin/composer /usr/local/bin/composer

# setup vault stuff
RUN mkdir /etc/vault
COPY .infrastructure/vault /etc/vault
RUN chmod 777 /etc/vault
VOLUME ["/etc/vault"]

# copy the resources
COPY . /var/app

# use the default production configuration
RUN mv "$PHP_INI_DIR/php.ini-production" "$PHP_INI_DIR/php.ini"

# utc time
ENV TZ=UTC
RUN ln -snf /usr/share/zoneinfo/$TZ /etc/localtime && echo $TZ > /etc/timezone
RUN echo "date.timezone=$TZ" > $PHP_INI_DIR/conf.d/timezone.ini

# php settings
RUN echo "memory_limit=8192M" >> $PHP_INI_DIR/conf.d/memory.ini
RUN echo "display_errors=1" >> $PHP_INI_DIR/conf.d/errors.ini
RUN echo "display_startup_errors=1" >> $PHP_INI_DIR/conf.d/errors.ini
RUN echo "error_reporting=E_ALL" >> $PHP_INI_DIR/conf.d/errors.ini
RUN echo "upload_max_filesize=100M" >> $PHP_INI_DIR/conf.d/upload.ini
RUN echo "post_max_size=100M" >> $PHP_INI_DIR/conf.d/postsize.ini
RUN echo "opcache.enable=1" >> $PHP_INI_DIR/conf.d/opcache.ini
RUN echo "opcache.enable_cli=1" >> $PHP_INI_DIR/conf.d/opcache.ini
RUN echo "opcache.jit=tracing" >> $PHP_INI_DIR/conf.d/opcache.ini
RUN echo "opcache.jit_buffer_size=100M" >> $PHP_INI_DIR/conf.d/opcache.ini

# www data owns this stuff below and can run apache, provided we fix the port
RUN chown -R www-data:www-data /var/app && chown -R www-data:www-data /etc/vault

# run it as user www-data and not root
USER www-data

# install composer dependencies
RUN cd /var/app && composer install -n --prefer-dist --optimize-autoloader --no-scripts --apcu-autoloader

# set permissions
RUN chmod -R 777 /var/app/storage

#  run on 8080 for no root
EXPOSE 8080

# run apache
CMD ["/usr/sbin/apache2ctl", "-D", "FOREGROUND"]
This is a production ready image for Laravel. It runs the container in non root mode (read here why its a bad idea to run them in root mode) and with a php.ini for production. It runs Apache on port 8080 because the first 1024 ports are reserved for root users only.
Note that the default Laravel setup is not stateless so it does not scale horizontally. You would need to use an external session storage like Redis or your database. And make sure that you store file data on S3 instead of the storage folder.
Go to the folder laravel in the repository and run:
aws ecr get-login-password --region eu-west-1 | docker login --username AWS --password-stdin ACCOUNTID.dkr.ecr.eu-west-1.amazonaws.com
docker build -t hcp-laravel-laravel .
docker tag hcp-laravel-laravel:latest ACCOUNTID.dkr.ecr.eu-west-1.amazonaws.com/hcp-laravel-laravel:latest
docker push ACCOUNTID.dkr.ecr.eu-west-1.amazonaws.com/hcp-laravel-laravel:latest
If you are on an arm64 Mac, you might run into the error exec /usr/local/bin/docker-php-entrypoint: exec format error when starting the container. This means the container has been built as arm64 but you are trying to run the container as an amd64 container. Make sure to build it as an amd64 image. Replace the docker build command by this one:
docker buildx build --platform linux/amd64 -t hcp-laravel-laravel .
Note your build time will increase because it needs to emulate the build.
Normally you would build and push such an container with a service CodePipeline or CircleCI. This can leverage a build cache and result in faster container builds.
Vault agent container
To be able to use the shared volume you must initialise the volume in your Docker container by using the VOLUME keyword.
We first must upload a custom image to the ECR registry with the Vault agent Docker container. This is due how bind mounts work in ECS. We must place a VOLUME directive in the container otherwise the folder will not be mountable.
Here is the Dockerfile you can use (it is also stored in laravel/.infrastructure/vault):
FROM hashicorp/vault:1.14
RUN mkdir /etc/vault
RUN chmod 777 /etc/vault
VOLUME ["/etc/vault"]
And to push this ECR image run the following commands:
aws ecr get-login-password --region eu-west-1 | docker login --username AWS --password-stdin ACCOUNTID.dkr.ecr.eu-west-1.amazonaws.com
docker build -t hcp-laravel-vault .
docker tag hcp-laravel-vault:latest ACCOUNTID.dkr.ecr.eu-west-1.amazonaws.com/hcp-laravel-vault:latest
docker push ACCOUNTID.dkr.ecr.eu-west-1.amazonaws.com/hcp-laravel-vault:latest
Remember that if you are on an ARM machine you must use buildx:
docker buildx build --platform linux/amd64 -t hcp-vault-laravel .
Now you must wait for the service to come up properly. It will not properly start because we have not configured the Vault server yet. But that is no problem for now.
You now have the container images ready now so the service should start successfully.
This concludes the first part of the tutorial. You now have a Vault Cluster and a ECS Cluster with a service. However you will get a 500 error when you try to access the load balancer URL. Let us try to debug this in the next step.
Debugging the container
We can use ECS Exec to gain access to the container so we can access the Laravel log files to check the error message.
First you need to install the Session Manager plugin on your computer as mentioned here.
You can run the following command (find the task ID by going to ECS > hcp-laravel-cluster > services > hcp-laravel-laravel):
aws ecs execute-command  \
    --region eu-west-1 \
    --cluster hcp-laravel-cluster \
    --task 83501ef433ae4bd59c415a9f11eb6c50 \
    --container hcp-laravel-laravel \
    --command "/bin/bash" \
    --interactive
You now have a shell in the container so you can debug.
Change directory (cd) to the /var/app/storage/logs folder and cat laravel.log, the error is:
production.ERROR: No application encryption key has been specified. {"exception":"[object] (Illuminate\\Encryption\\MissingAppKeyException(code: 0): No application encryption key has been specified. at /app/vendor/laravel/framework/src/Illuminate/Encryption/EncryptionServiceProvider.php:79)This is correct because there is no .env file in the /var/app folder. Laravel requires the APP_KEY to be set. We will solve that in the next section.
Provision Vault Cluster
Deploy Vault settings
Of course we want our Vault cluster to be managed through infrastructure code. This way we can replicate the settings across all instances of pre-production environments.
This is the start of part two of the tutorial. You need to uncomment all the code in vault.tf before running apply again.
Now generate an Vault admin token from the HashiCorp admin console and set this to your environment:
export VAULT_TOKEN='vault_admin_token'
This token might expire so you might need to rerun that code if you get errors (like unable to fetch organization list or unable to get project from credentials). Normally you would not use the admin token but you would make an AWS IAM Role that would be able to authenticate to Vault to provision it.
terraform apply -var="vault_url=https://PUBLICURLTOYOURVAULTCLUSTER:8200"
From now on make sure to run the apply command with the -var argument otherwise the Vault contents will be destroyed again.
The Vault cluster will now be provisioned for you. You can check out the file vault.tf on how the provisioning works. But in short:
- It creates the mount for a general secret
- It creates some secret structure for Laravel
- It creates the authentication roles so we can authenticate through IAM roles to Vault
- It creates a database mount with rotation enabled (and automatically rotates this password via Vault so the password in the state file is then invalidated)
- It creates a simple policy so the Laravel container can access the mounts database/ and secret/
Update Vault secrets
In this case I opted to set the secrets in Vault initially (to set up their structure). However I then manage them in Vault. This way the secrets do not get stored in the state file. You then still have the benefits of managing the secret structure through Terraform but use Vault to store the real secrets.
We can set the app_key, go to the local laravel folder and run:
php artisan key:generate
You can find the new app key in the .env file.
Login to Vault UI and change the secret to reflect the correct app_key:

You can also navigate to the database mount and generate temporary database credentials for the Aurora database (this is how your developers would get access to the database):
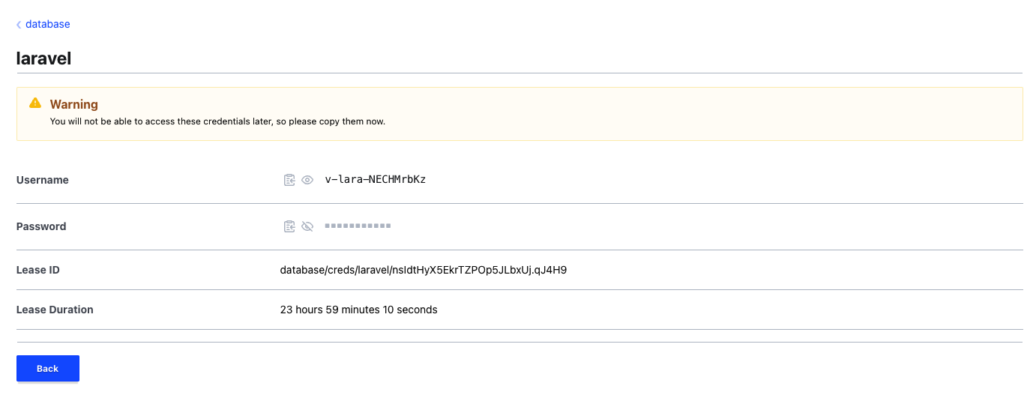
The root user details have been rotated automatically so the password to the root user is only known to Vault.
Note I am using the admin token to access Vault (this is a bad practice) but you can setup integrations with other services like Okta, GitHub or username and password.
Integrate Vault with Fargate via IAM roles
We can now add the sidecar container with the Vault Agent. The Vault Agent will connect to Vault, authenticate through the IAM Task role that is attached to the container instance. It will generate a .env file and place this in a shared volume so Laravel can access it. This means we only need to change Laravel to monitor for this .env path. There are no further changes needed to Laravel because as far as Laravel knows, the .env file is generated according to it’s specifications.
You do need to be aware of the following edge case though: If you run an artisan command that takes longer than 24 hours (the maximum TTL set for a database credential) you might run into issues. This is another reason why you should prefer short running chained tasks on AWS instead of long running tasks.
For the web interface this is not really a problem as every request will read the .env file again. The .env file is kept up to date automatically by Vault agent.
Checking the results and finalising
The setup as is should work and generate an .env file for Laravel in /etc/vault/.env:
7/19/2023, 2:29:14 PM GMT+2 2023-07-19T12:29:14.155Z [INFO] (runner) rendered "/etc/vault/vault-template.ctmpl" => "/etc/vault/.env"
If the database credentials expire Vault Agent will automatically generate a new .env file.
We now need to configure Laravel to monitor for this .env file and use it if a custom ENVPATH is given. We can do that by changing the bootstrap/app.php file and adding the following code before returning the $app (this has already been done in the Docker image that is included):
$envPath = getenv('ENVPATH');
if($envPath && file_exists($envPath . '/.env')) {
    $app->useEnvironmentPath($envPath);
}
After deploying this we still need to run the migrations otherwise we will have a 500 error that the tables do not exist. We can simply do this by running ECS exec in the container again to get shell, then navigate to /var/app and run:
php artisan migrate
Normally you would start the task with a command override to achieve such behaviour. You can now see our beautiful website generating cat images on refresh:
After you are done with this tutorial how to run Hashicorp Vault Cloud
This was quite a long tutorial. Setting up Hashicorp Vault cloud together with Laravel has a lot of moving parts and I have only covered a small part of it! After you are done with this tutorial run terraform destroy (with the -var argument) to clear the infrastructure and prevent further costs.